
Preview:
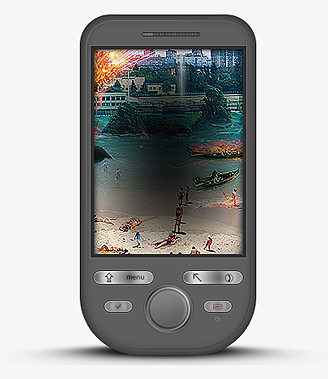
HTC Tattoo Design.
Step 1:
Let’s start out by creating a new file. I used a 700×700 pixels canvas set at 72dpi, and I filled my background with white. Make a new layer set and name it 'HTC Tattoo'.
Select the Rounded Rectangle Tool and set the radius setting to 40 px. In a new layer draw a large gray rounded rectangle with #5E5E5E color shade and 205 x 385 px dimensions. Cut the bottom corners off the gray rounded rectangle. Now set the radius setting to 70 px and in a new layer draw a smaller gray rounded rectangle with 208 x 155 px dimensions. Then combine both shapes at the bottom as shown below.
Step 2:
Under Layer Style(Layer > Layer Style) add an Inner Glow blending option to the large rounded rectangle layer.
Result:
Step 3:
Create a new layer then draw a dark gray rectangle with #646464 color shade and 133 x 47 px dimensions on the bottom side of the printer design.
Step 4:
Under Layer Style(Layer > Layer Style) add a Stroke blending option to the large white rounded rectangle layer. Then set the layer's blending mode to Darken.
Result:
Step 5:
Now add a screen design with a size of 183 x 249 px dimensions.
Sample:
Step 6:
Under Layer Style(Layer > Layer Style) add an Inner Shadow, Outer Glow, Inner Glow, Satin, Pattern Overlay and Stroke blending options to your screen design layer.
Result:
Step 7:
Create a new layer. On top of the screen draw a thin rounded rectangle with #444243 color shade and 69 x 5 px dimensions.

Step 8:
Under Layer Style(Layer > Layer Style) add an Inner Shadow, Pattern Overlay and Stroke blending options to the thin rounded rectangle layer.
Result:
Step 9:
In a new layer draw a gray circle with #6E6D6B color shade and 51 x 51 px dimensions just below the screen design.
Step 10:
Under Layer Style(Layer > Layer Style) add an Outer Glow, Inner Glow, Gradient Overlay and Stroke blending options to the gray circle layer.
Result:
Step 11:
In a new layer draw a black circle with 51 x 51 px dimensions on the center of the gray circle design.

Step 12:
Under Layer Style(Layer > Layer Style) add an Inner Shadow, Inner Glow and Stroke blending options to the black circle layer. Then set the layer's blending mode to Lighten.
Result:

Step 13:
Create a new layer, next to the circle button draw a small gray rounded rectangle with #C0C0C0 color shade and 33 x 13 px dimensions.
Step 14:
Under Layer Style(Layer > Layer Style) add an Outer Glow, Inner Glow, Satin, Gradient Overlay and Stroke blending options to the small gray rounded rectangle layer.

Result:
Step 15:
Duplicate the small gray rounded rectangle button and position it on the right side of the circle button. Now select the Horizontal Type Tool then set the font family to Webdings, 14 pt, smooth and #506F5D color shade. In a new text layer type 'a' to get the check icon for the first button design. Then in a new text layer type ';' under font wingdings and #8D3C43 color shade to get the second icon for the second button.
Step 16:
In a new layer draw long gray rounded rectangle with #C0C0C0 color shade and 71 x 15 px dimensions just above the rounded rectangle and circle buttons.
Step 17:
Under Layer Style(Layer > Layer Style) add an Inner Shadow, Outer Glow, Inner Glow, Satin, Gradient Overlay and Stroke blending options to the long gray rounded rectangle layer.


Result:
Step 18:
Now add another long rounded rectangle button on the right side of the circle button. Then add the word menu and more icons found under font Wingdings and Wingdings 3 on the long rounded rectangle buttons.
Results:
HTC Tattoo Design.