
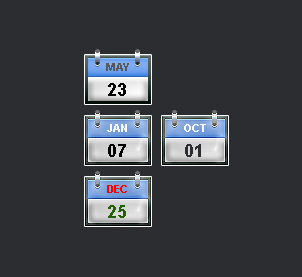
Preview:
Stylish Blog Calendar Design.
Step 1:
Let’s start out by creating a new file. I used a 300×300 pixels canvas set at 72dpi, and I filled my background with #2B2D30 color shade. Now make a new layer set and name it 'Blog Calendar'. In a new layer draw a gray rectangle with #2B2D30 color shade and 66 x 49 px dimensions.

Step 2:
Under Layer Style(Layer > Layer Style) add an Inner Shadow, Gradient Overlay and Stroke blending options to the gray rectangle layer.

Result:
Step 3:
In a new layer draw a light blue rectangle with #8AB3F1 color shade and 60 x 19 px dimensions.
Step 4:
Under Layer Style(Layer > Layer Style) add a Drop Shadow, Inner Shadow, Satin and Gradient Overlay blending options to your light blue rectangle layer.


Result:
Step 5:
In a new layer draw a white rectangle with 60 x 24 px dimensions.

Step 6:
Under Layer Style(Layer > Layer Style) add a Drop Shadow, Inner Shadow, Inner Glow and Gradient Overlay blending options to the white rectangle layer.
Result:

Step 7:
In a new layer draw a small gray rounded rectangle with #525A65 color shade and 5 x 17 px dimensions. Position it on the top left side of the rectangle design.
Step 8:
Under Layer Style(Layer > Layer Style) add a Drop Shadow, Inner Shadow, Satin and Gradient Overlay blending options to the small gray rounded rectangle layer.
Result:
Step 9:
Duplicate the small gray rounded rectangle design layer and position on the other side of the rectangle design. Now select the Horizontal Type Tool, set the font family to Arial, Bold, 11 pt, none and #585858 color shade. In a new text layer type the month between the two small gray rounded rectangle designs. Then in a new text layer type the day of the month on the white rectangle design using font Arial, 18 pt, none and black color shade.
Results:
Stylish Blog Calendar Design.